After several attempts (blogged here, here, and here) at getting an Atmel AVR chip on a daughter board to communicate with a Raspberry Pi, I am now excited to report that I have it working.
I turned out here were several things wrong:
- I needed to stop the Raspberry Pi serial port console login, as it was confusing things no end.
- As I reported last time, I had copied a "Board Definition" from one for an Arduino on a Gertboard. Unfortunately it appears that the Gertboard uses a 12MHz crystal, where my circuit uses 16MHz, like the Arduino Uno.
- In addition, there was an error in my wiring. It turns out that all my puzzlement over what pin the data was being transferred on was largely due to me mis-reading my own diagram, and connecting the serial lines to pins 6 and 8 on the Raspberry Pi GPIO header rather than pins 8 and 10. D'oh!
To make sure it all works, I wrote a simple program in the Arduino IDE. The idea is that it prints a prompt asking for input. The user then types a line of stuff (ending with the enter key), which the program gives back. When testing this I found that because the AVR starts so much faster than the Raspberry Pi, the prompt has long since been sent by the time the Pi terminal emulator is running. To make this a little more friendly, I added some code to show the prompt again if the user gives an empty line (by just pressing enter, for example.)
#define LEN 100
int c;
char input[LEN+1];
int i;
boolean reset;

boolean isVisible(int c) {
  return (c >= 32 && c <= 128);
}

void setup() {
  Serial.begin(9600);
  reset = true;
}

void loop() {
  if (reset) {
      Serial.println("Termial I/O demo. Enter something");
      reset = false;
  }

  i = 0;
  input[i] = 0;
  for (;;) {
    if (Serial.available() > 0) {
      c = Serial.read();
      if (i == LEN) break;
      if (isVisible(c)) {
        input[i++] = c;
      } else {
        break;
      }
    }
  }

  if (i > 0) {
    input[i] = 0;

    Serial.print("You typed '");
    Serial.print(input);
    Serial.println("'");
  } else {
    reset = true;
  }
}
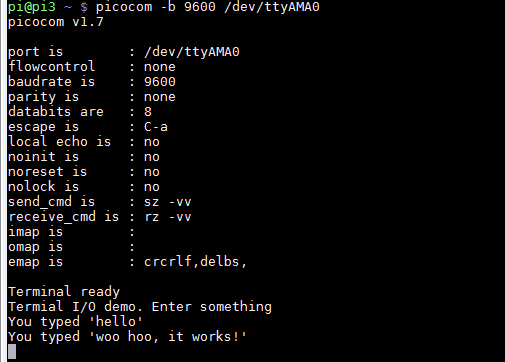
And here it is working:
Of course, nothing is ever perfect. With all the messing around I did with the wiring, I seem to have broken something in the programming connections, so I can not program the ATMega chip in situ at the moment. However, as the Arduino IDE uses the serial port by default, all I need to do is program an Arduino bootloader (using the ArduinoISP I built some time ago) and I can program the AVR that way, albeit a bit more slowly and without the ability to use the whole program space.