Pi Face on Linux

I know, I said I should give up buying new toys for my Raspberry Pi, and concentrate on doing interesting stuff with the bits I already have. But then I got a notification from Farnell that a stock of Pi Face boards was available. Like the GertBoard, this one has been on back-order for ages. Since I was ordering a Pi Face, and as I am supposed to be doing some sort of presentation on Tuesday to IPRUG about all things Raspberry Pi, I also ordered a few other bits.

SANYO DIGITAL CAMERA

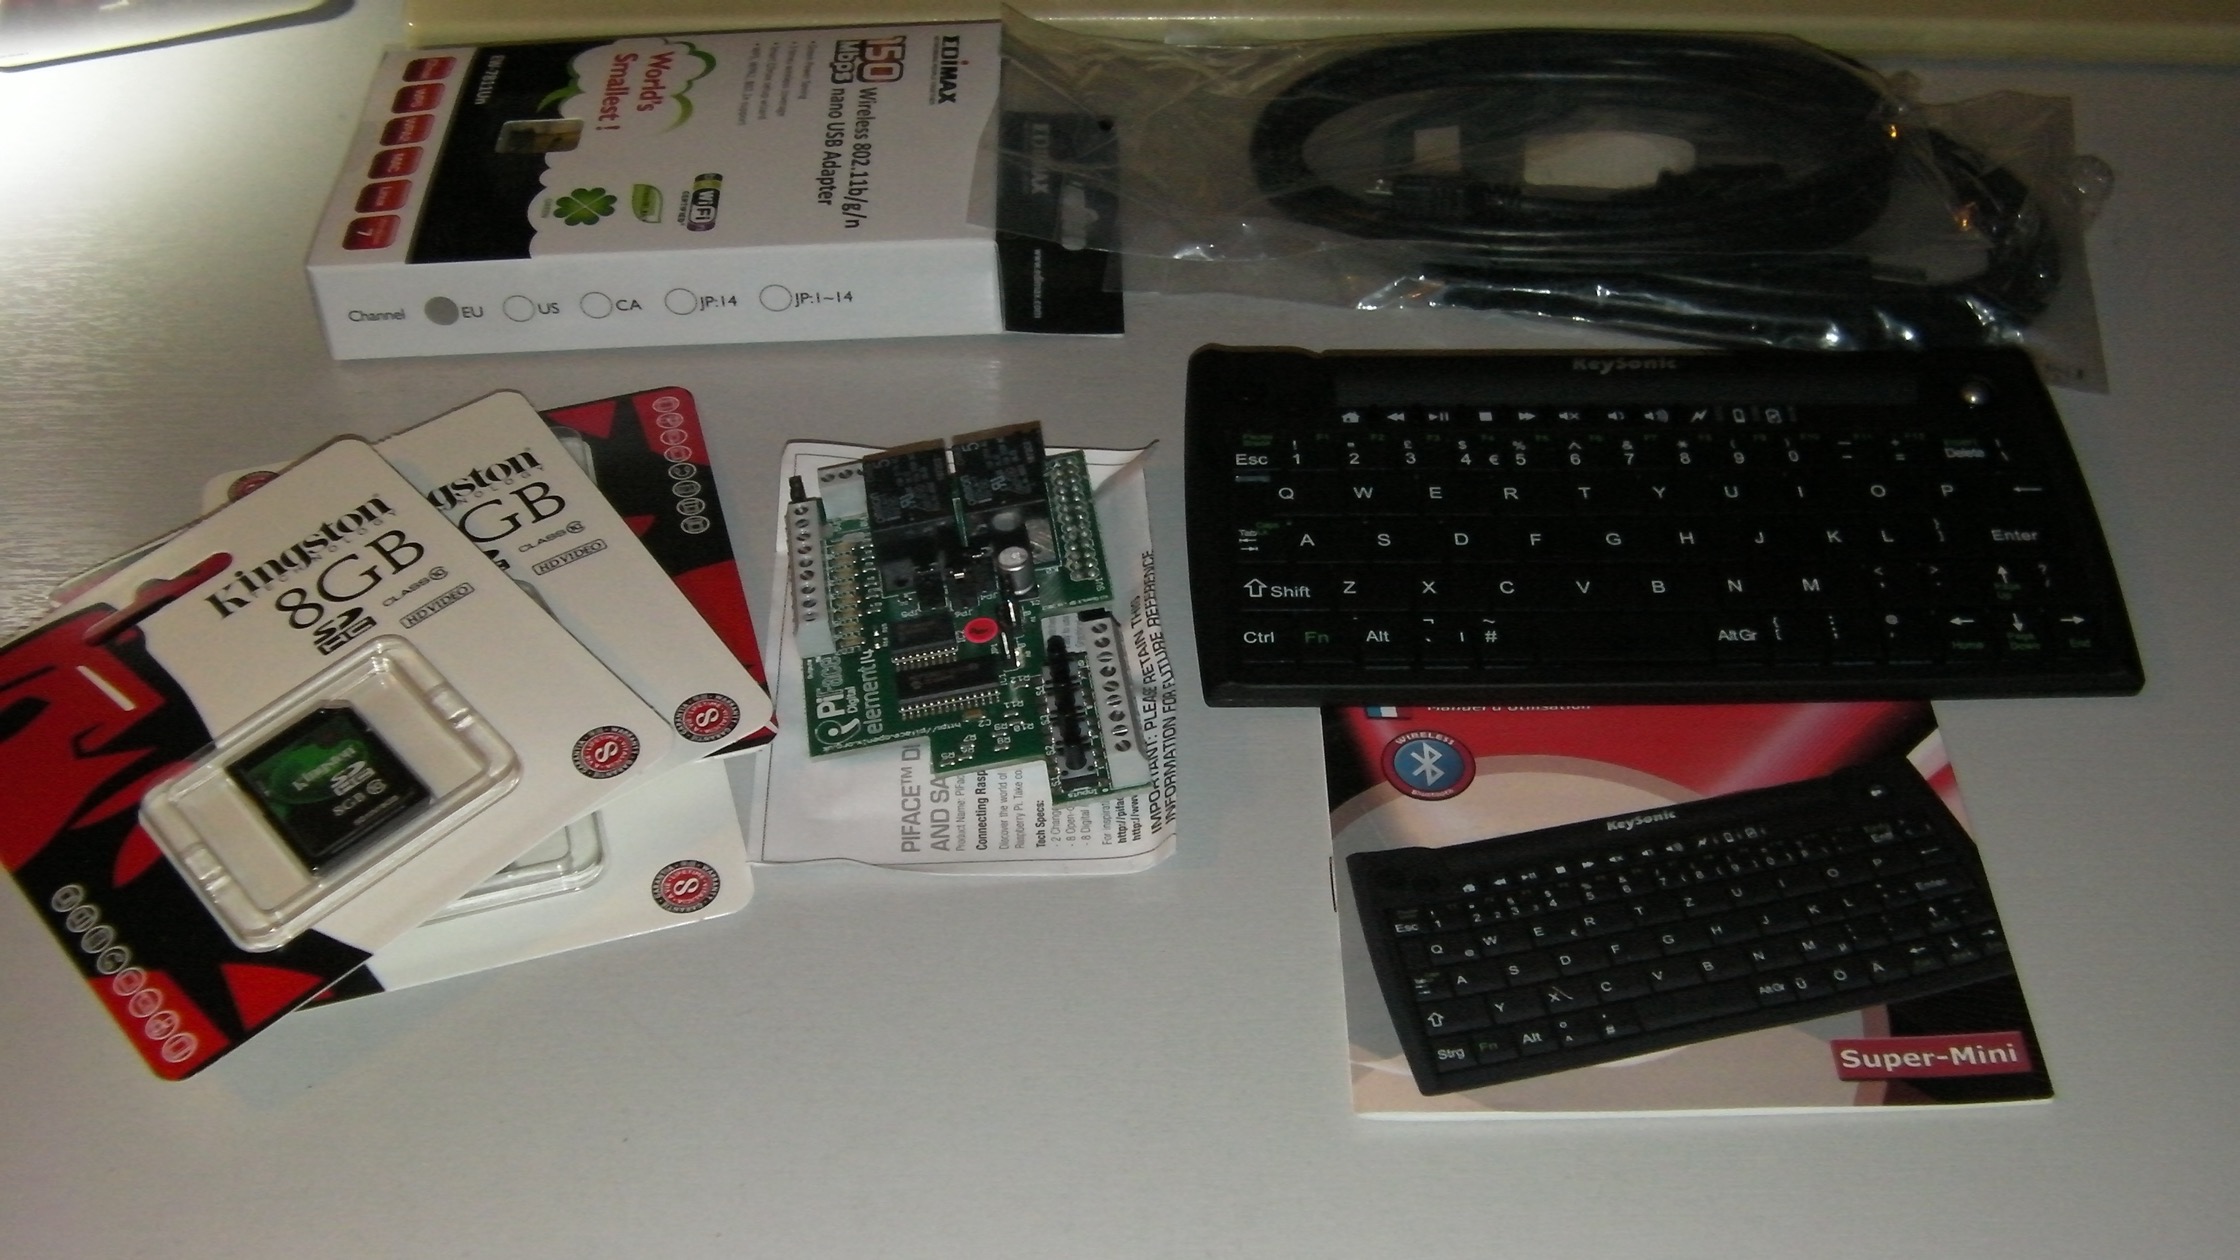
In the photo, the Pi Face board is in the middle. Surrounding it are some extra SD cards, a wifi dongle, some extra micro-USB power cables so I can run more than one Pi at once, and a tiny bluetooth keyboard. The keyboard really is tiny, compare its size to the SD Cards! I also ordered a bluetooth dongle to use with the keyboard, but that’s not in the picture.

I spent at least an hour trying to get wifi and bluetooth working on the Raspberry Pi using the various Linux SDs I have lying around, but with no luck. All I managed with my wi-fi efforts was to slow down the boot sequence as it hunts around for an access point without any luck. The bluetooth keyboard worked fine paired with my phone, and also with my dev PC using the little bluetooith dongle I just bought, but no luck with the Pi.

Part of my trouble is that I’m not even sure how I would know that the bluetooth keyboard is working. I usually connect to the Raspberry Pi using ssh over ethernet from my PC. This will only use the bluetooth keyboard if it is paired with the PC. I did plug in a HDMI monitor but it stops at a login prompt before it can bring up the X desktop. Despite my best efforts, I could not get the keyboard to allow me to log in at that point. More research needed, I think.

After becoming increasingly fed up with this, I decided to give up and have a go with the Pi Face. Given that the name “Pi Face” seems to be related to a character in the “Dennis the Menace” cartoon, I thought it only right that I attach the Pi Face to my Raspberry Pi in the Dennis-coloured red and black case:

SANYO DIGITAL CAMERA

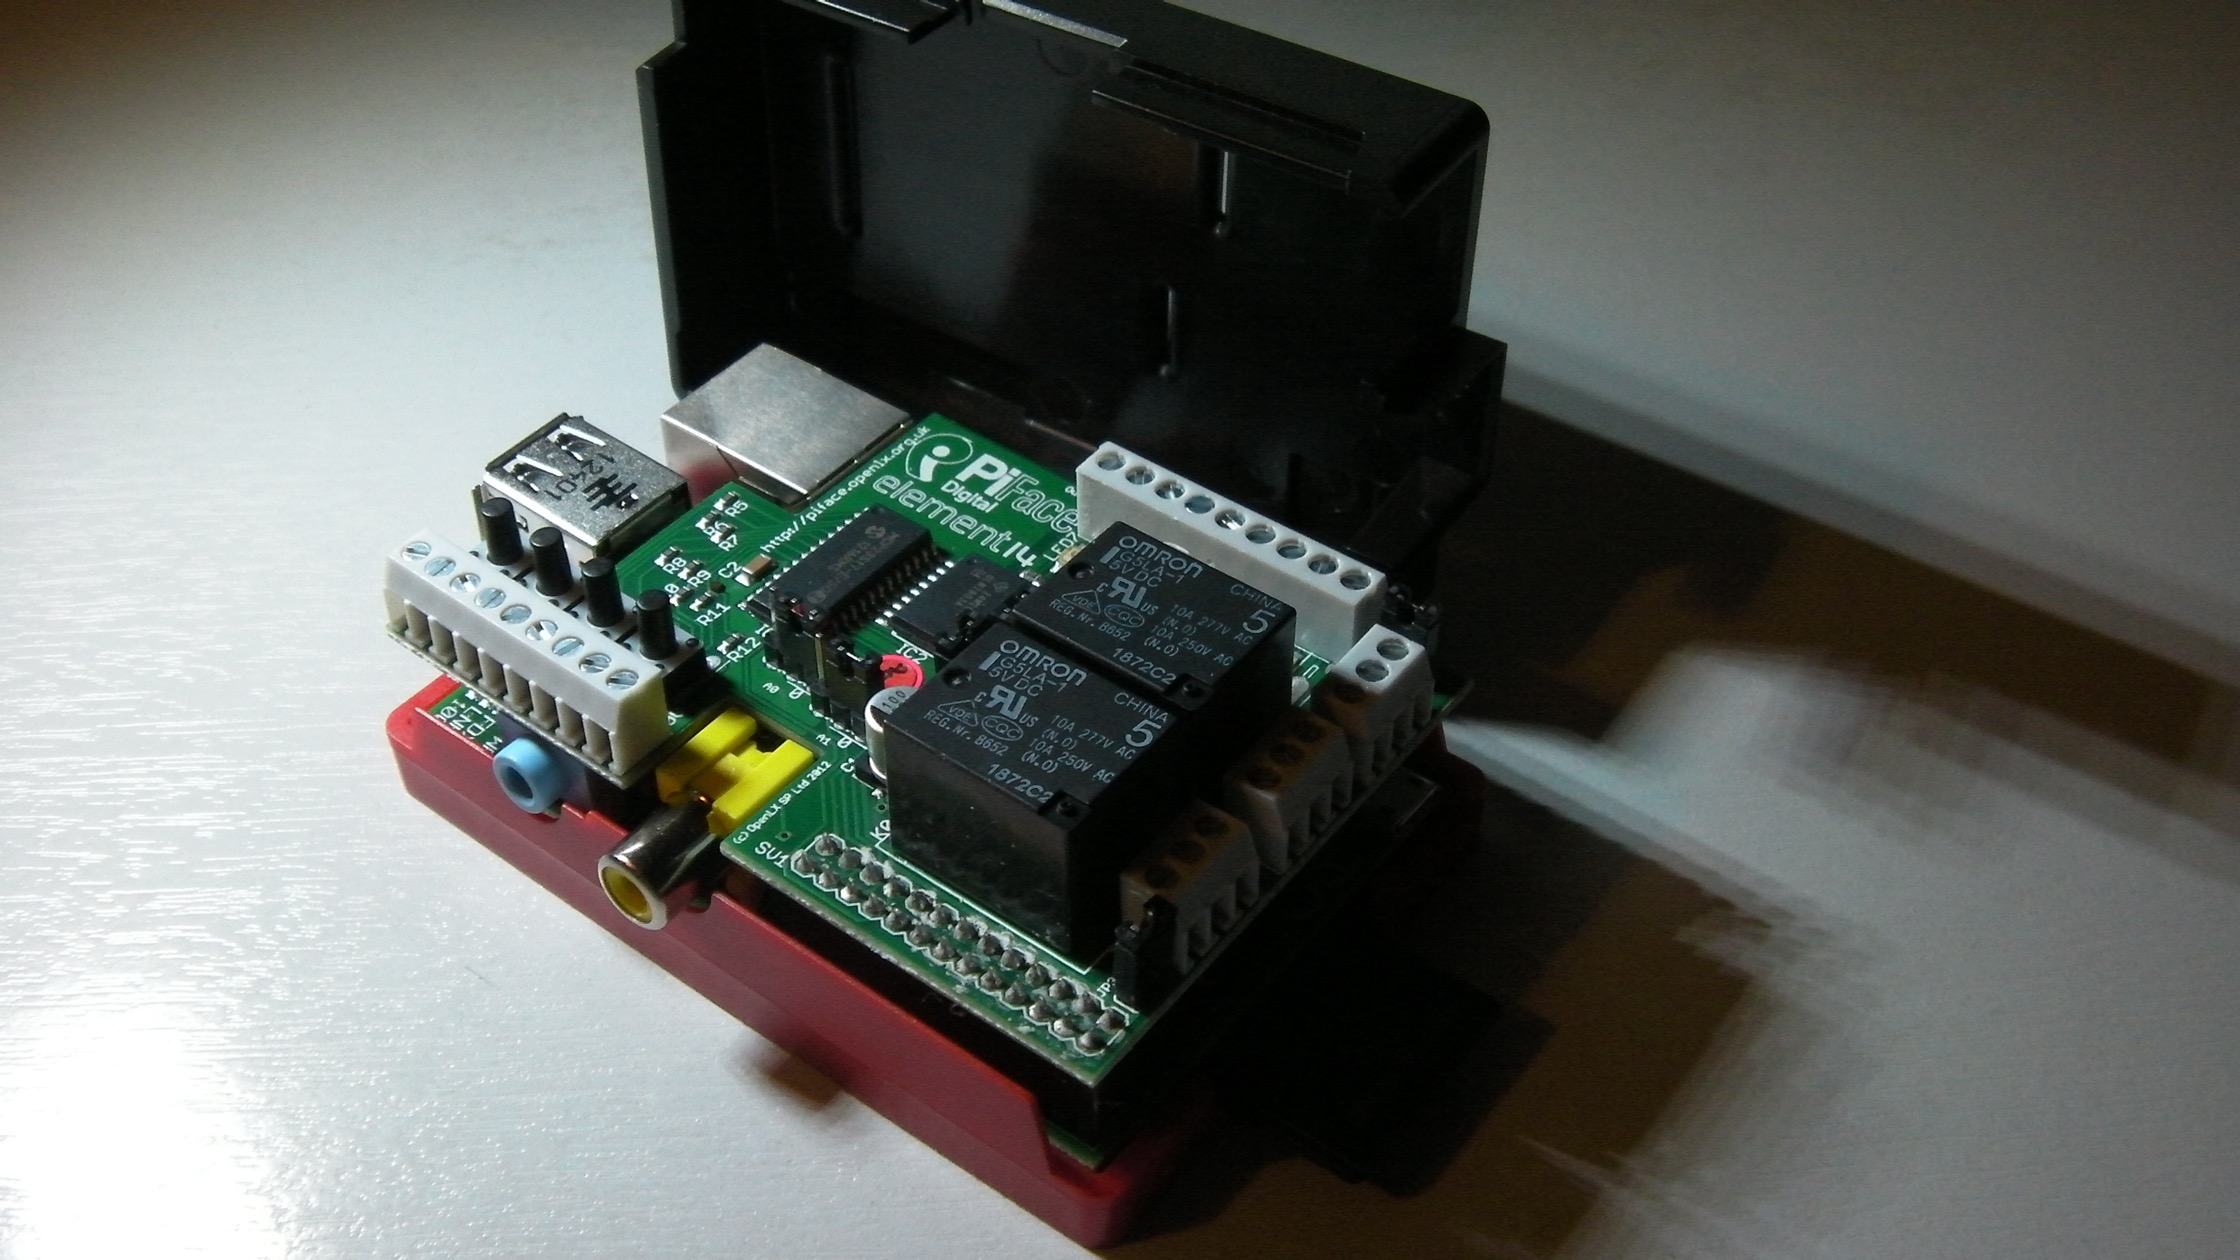
Fitting the board was very easy, but unlike some of the other add-ons I have attached recently, it is too big for the top of the case. By this point I was also unsure what state I had left the various Linux SDs in, so I opened up the packet of one of my new ones, slapped a fresh 2012-12-16 Raspbian wheezy on it, and ran sudo raspi-config to stop it wingeing. I then followed the steps on the PiFace getting started page. The page is currently only at “draft” status, and there are a few minor “gotchas”, so here’s what I did:

  • sudo nano /etc/modprobe.d/raspi-blacklist.conf. Note that the install instructions miss off the leading slash (/). If the file that appears is empty, you need to add the slash.
  • add a # to both the blacklist lines. I’m doing hardware stuff, and I want both 12c and spi available, but for just the Pi Face, strictly you only need the spi one.
  • sudo apt-get update. Takes a few minutes but is always a good start to make sure you are fetching the latest versions of dependencies
  • wget http://pi.cs.man.ac.uk/download/install.txt. The instructions add |bash to the end of this, but it did not work for me. Instead, I did:
  • bash install.txt. I didn’t time it, but this took a lot of minutes. Enough for a cup of tea. It also gives lots of output with lots of stuff being installed. If you don’t get lots of output, something is wrong.

Once all that stuff was finished, the Pi Face software was installed, so I ran the suggested test command piface/scripts/piface-emulator. I was really impressed with this. Even though I don’t run using the regular keyboard and monitor, I do use MobaXterm, which redirects the X display to my development PC, so I got to see and interact with the hardware on my screen.

piface-ui

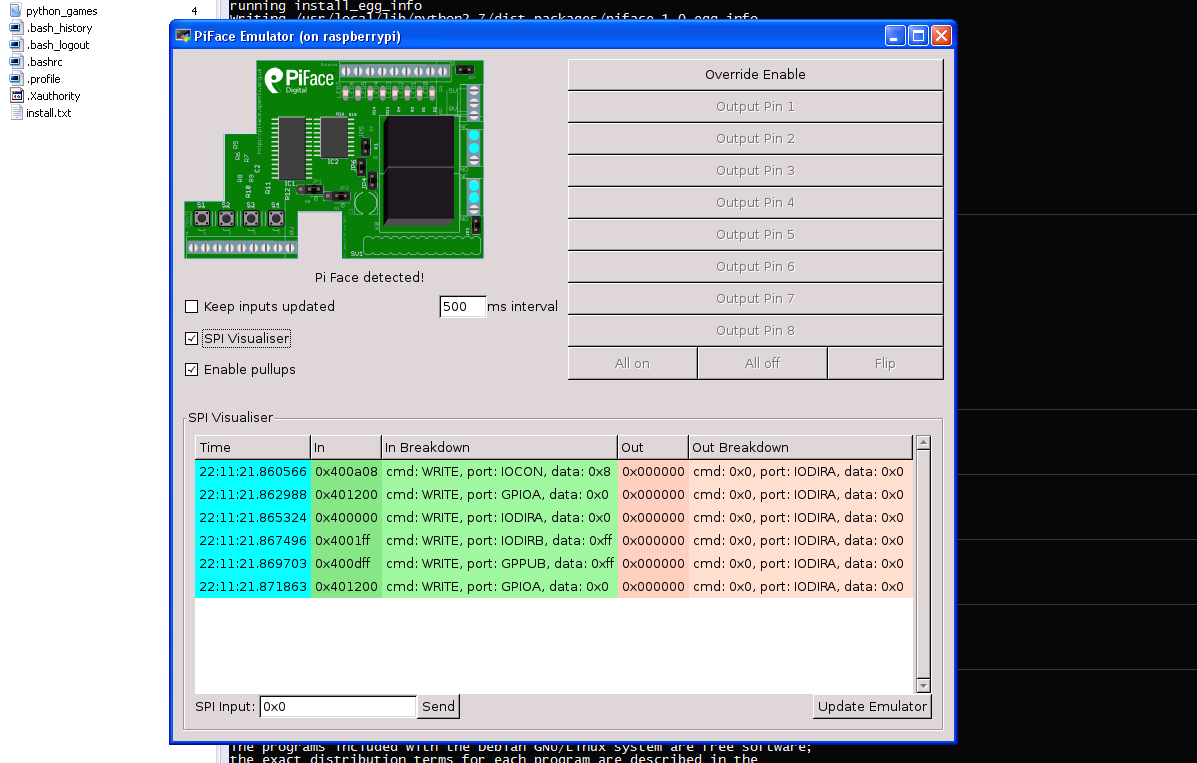
This is not just a pretty picture. clicking the buttons on screen lights the lights and clicks the relays on the board, and pressing the buttons on the board lights up the pins on the picture. I like this so much I would recommend that other interface boards do something similar. No time left to connect anything exciting to the board, I’m afraid, but that can be for another blog.

15 Comments

  1. Pingback: Early look at the Pi Face board for #RaspberryPi | Raspberry PiPod

  2. Hi, Great instructions which I followed to the letter with fresh image etc. Started emulator which loaded and said “Pi Face detected!” but I could not get any leds to light on board or any other funtions.
    Any suggestions would be appreciated.
    Thank you for your time. Robert

    • That’s odd. Mine worked first time. Just in case it wasn’t clear, did you click the “override enable” button at the top-tight of the PiFace UI? It enables the other on-screen buttons.

      Also if you check “leep inputs updated”, you can try pressing the buttons on the PiFace, to see if they light up the little coloured blobs next to the buttons on the picture.

      let me know how you get on!

      • Frank, Thank you for your help. Yes, I have tried them all with no life from board. I also tried the piface image on another card but that would not run the emulator as it could not detect the board.
        All the connection pins look ok between pi and piface.
        Do you think it may be a fault with the board?

        • I’m stumped by this. Without the board in front of me to have a look at it’s tough to offer any more suggestions. If you know of any other Pi users nearby (I’m afraid I don’t know where you are) you could try to see if anyone else can get it to work, but if not, your best bet may be to contact the vendor.

          Sorry I can’t offer more than that.

  3. Hi!
    First great thanks to Frank, installation instructions were perfect!
    Then starting emulator, it showed leds blinking when buttons clicked, but nothing happened on my board. Then checked jumpers JP1 and JP2 (board address): they were both 1. Then shutdown, both jumpers to 0, boot and everything were OK. Nice clicking and flashing! Now have to learn some python, I think.
    Best regards,
    -murtsi

  4. Pingback: Raspberry Alpha Omega

  5. Pingback: Getting the PiFace connected | Does it work? And if so, how?

  6. Thanks for the tips, I got the RasPi working pretty fast the second time of trying (I used an up-to-date image. The one with it died and refused logins suddenly) and I got the PiFace working in about 15 minutes, most of which was waiting for downloads and installs.

    One bit they’ve not updated in the “official” instructions is the missing / on the /etc/ path. That’s how I ended up here! (Element14 and co really should have some easy install instructions linked to from the instructions on/in the PiFace though – I stumbled around Google for a bit…)

  7. Just thought I’d chip in again.

    I just got SSH working through MobaXterm. Brilliant! I can now access the Pi remotely better than when I’m sitting next to it!
    It was great to get the PiFace working remotely – the relays click soundly and the LEDs turn on. You can also run the remote client from multiple machines and toggle things on and off really neatly, securely.

    Can’t wait for the new little PiCam. It’ll be amazing to throw an SSH tunnel across the ‘net, and combined with the PiFace it will allow almost trivial control and viewing of anything!

    Question: The Linux distros all seem to have the same weakness when it comes to lower scren resolutions. If there a way to ask the Pi to run X across the network at a higher resolution than it runs on the PI? Things like the dialogue boxes are impossible on a VGA composite output!

  8. pi@raspberrypi:~/Project/src/pifacedigitalio/examples/python3 blink.py

    Traceback (most recent call last):
    File “blink.py”, line 9, in
    pifacedigital = pifacedigitalio.PiFaceDigital()
    File “/usr/local/lib/python3.5/dist-packages/pifacedigitalio/core.py”, line 82, in __init__
    self.init_board()
    File “/usr/local/lib/python3.5/dist-packages/pifacedigitalio/core.py”, line 107, in init_board
    h=self.hardware_addr, b=self.bus, c=self.chip_select))
    pifacedigitalio.core.NoPiFaceDigitalDetectedError: No PiFace Digital board detected (hardware_addr=0, bus=0, chip_select=0).

    The above error message appears.
    I bought a bad board.
    If not, please advise what action should be taken.

Leave a Reply

Your email address will not be published. Required fields are marked *