PiFace Control and Display

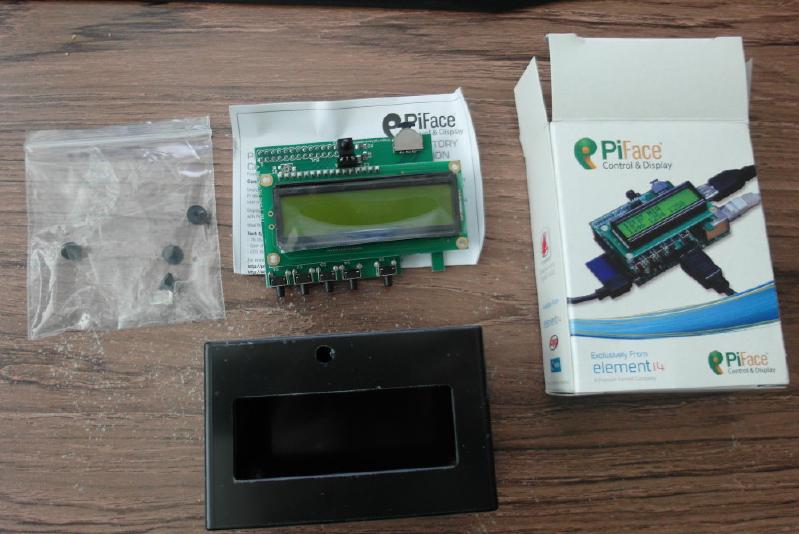
I was very excited to read about the new PiFace Control and Display board. On a first look at the spec it seems to have a really sweet set of features. A two line display, some general purpose buttons, a left/right/click joggle wheel and an infra-red sensor. This little board opens up a world of possibilities for using the Raspberry Pi as a standalone device without a screen, keyboard or mouse.

I was particularly impressed at the price. Farnell has it for just £21 – less than the price of a USB infra-red “dongle” on its own. I ordered one straight away and it arrived today! As a side note, I also ordered the special Raspberry PiPiFace Control and Display case for it, but that’s a story for another day.

Read Pearson Reviews & Rationales: Pharmacology with “Nursing Reviews & Rationales” (4th Edition) Paperback – isuzu rodeo ue and rodeo sport ua 1999 2002 service repair workshop manual original fsm winstrol for sale sports pharmacology: maximum effect without compromising health

SAM_0085_small

Keen to get started I began by following the “operating instructions” linked from the Farnell page. These were a reasonable start, but did have a few problems.

I started with a fresh image of the latest Raspbian (2013-09-25) from the official downloads page. When it started up I used the options in the initial raspi config screen to expand the SD card partition and enable SPI (this is in the “advanced” submenu, but it is needed for the display to work. The instructions leapt straight in to

sudo apt-get install python3-pifacecad

but this did not work for me. I needed to do sudo apt-get update first.

Once I had installed the pifacecad driver, I followed the instructions and tried:

python3 /usr/share/doc/python3-pifacecad/examples/sysinfo.py

It kind of worked, but the LCD was barely visible. If I twisted it around to look at it from odd angles, I could get hints that there was something on the screen. The document I was following seemed to be aware of the problem, but just offered:

If your LCD has nothing appearing on it or its character spaces are all
black, try adjusting the contrast screw with a small star head screwdriver. You can try using a chip on glass LCD display with a smaller footprint and lower power consumption.

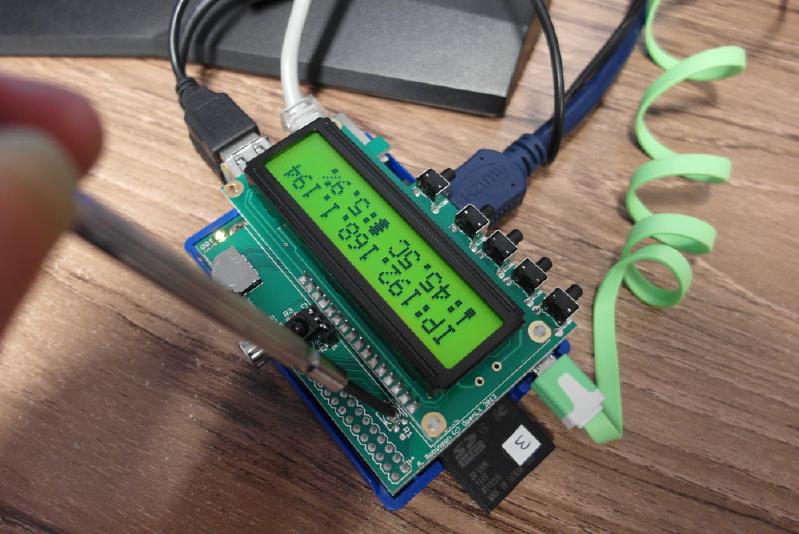
Unfortunately it completely fails to mention where to find the mystery “contrast screw”.

A bit of googling led me to some more PiFace Control and Display documentation at github. This did at least describe where the contrast screw might be found. In case anyone else is in a similar position, here’s a photo of me adjusting it!

SAM_0089

A bit of twiddling made it nice and black. The python command to display the IP address and so on is all very nice but I wanted to move on to other stuff, so I exited it with ctrl-C.

The next section of the document concentrated on setting up the infra red remote input. This was not as smooth as the python screen driver, though. The first step was to install and test the lirc_rpi module:

sudo modprobe lirc_rpi gpio_in_pin=23
pidof lirc

The “pidof” just returned to the command prompt. It neither reported a pid number nor gave an error message. I can only assume this means everything is OK. The next step is to test the hardware to see if any infra-red signals are making their way through to the lirc driver.

mode2 –d /dev/lirc0

This gave a splurge of “ulse 621” “pace 543” down the left side of the screen. I’m sorry to say that it took me a few moments to realise that the first character was off the edge of the screen, so it is probably really reporting “pulse” and “space” timings. This did prompt me to give up on direct keyboard and screen, and fall back to my usual ssh access. Handily, I did not need to fiddle around to work out the IP address – it was already on the LCD display!

I wanted to try it out with an old remote handset. I could not find its name in the big list of LIRC remotes, so I went for the “generate your own configuration” approach. It was a bit tedious, but once I realised that the key names were of the form BTN_0, KEY_PREVIOUS and so on, I was away. When I had recorded all the buttons I could find, I rebooted as per instructions and ran “irw” to test the remote control. This gave me nothing. The hardware is still working, as the mode2 –d /dev/lirc0 command still shows the pulses.

It’s entirely possible that the old remote (or its batteries) is at fault here, though. Not all the buttons seem to even send an IR code, and I have no idea how old the batteries are. I’ll try again tomorrow with a different remote and see if that makes any difference.

In conclusion I really like this board. It has such a nice set of features and price that I can already imagine lots of uses for it. The documentation is a bit sketchy in places, but that is to be expected. I would have liked a short section on using the buttons and joggle wheel just to prove that everything is working.

As for the hardware design, my main concern is that (as with so many boards) it gobbles up all the pins on the GPIO header, effectively preventing its use as a control interface for other hardware. Even something as simple as providing header pads for SPI and/or i2c would make this much more useful in combination with other hardware. It might be possible to replace the 26-way header with one with longer legs, but the IR sensor is positioned very close to the header and might get in the way of things plugged in.
30 Comments

  1. Pingback: Review of the PiFace Control and Display for the #RaspberryPi | Raspberry PiPod

    • Thanks for getting in touch Thomas. As I said in the review, I really like the board. I have bought pretty much every Pi board there is, but most of them just sit in my parts box. There’s something about the combination of features on this one which fills my head with possibilities. Good job!

    • Did you figure out how to use the infrared remote (once configured) together with
      the example radio.py?
      I guess I have to edit the file radiolircrc? But there is no example in it of which lines to adapt.
      Should radio.py also be modified?

      kind regards,
      hugo

        • Dear Thomas,
          Could you check whether the following is correct?:
          1. cp /usr/share/doc/python3-pifacecad/examples/radiolircrc ~/.lircrc
          (note that you missed a dot before lircrc in your answer)
          2. edit ~/.lircrc
          But here I am in doubt what to change and what to leave. I would be nice
          to see some comment lines in the file radiolircrc telling what to change with some possible examples.
          When I run irw and press the buttons on my remote, I see a name which corresponds to the keys I press (which I learned the system with sudo irrecord -f -d /dev/lirc0 /etc/lirc/lircd.conf),
          do I have to use those names?

          kind regards,
          hugo

        • Maybe my question was not clear enough, therefore here’s a second attempt:
          I first configured my remote control like this:
          sudo irrecord -f -d /dev/lirc0 /etc/lirc/lircd.conf
          afterwards I tried it out using the command irw and I do see the correct info when pressing the keys.
          I then performed this step:
          cp /usr/share/doc/python3-pifacecad/examples/radiolircrc ~/.lircrc
          Then I opened the file ~/.lircrc with an editor
          I see stuff like this:
          begin
          remote = *
          button = 1
          prog = pifacecad-radio-example
          config = 1
          end
          Which lines should I change?
          I tried this:
          button = KEY_NUMERIC_1

          but to no avail

          should prog = complete_path_plus_radio.pi ???

          Can someone here clarify this a bit?

          thanks in advance
          hugo

          • `button` is the button code from your remote. Check inside `/etc/lirc/lircd.conf` for available button codes. `prog` is the name of the program to be alerted about the button press. In the case of radio.py it’s `pifacecad-radio-example` (you can see radio.py identifying itself as this here).

            The only thing you have to change is the `button`.

          • Here is an answer to my question (which I think is more appropriate for a newbie):
            1. learn the pi to recognize your remote control commands
            with the following command:
            sudo irrecord -f -d /dev/lirc0 /etc/lirc/lircd.conf
            2. look at the content of /etc/lirc/lircd.conf
            with the following command:
            less /etc/lirc/lircd.conf
            3. look for the _text_string_ immediately following the word name
            e.g. you’ll see this line:
            name KEY_NUMERIC_1
            What you need to remember is:
            KEY_NUMERIC_1
            4. sudo nano /usr/share/doc/python3-pifacecad/examples/radiolircrc
            look for the lines
            button = something
            replace something with the string you had to remember e.g.
            button = KEY_NUMERIC_1
            5. repeat 3 to 4 for other keys

            regards,
            hugo

  2. To prevent the console display from taking the ‘P’ and losing the ‘S’ at the start of the display line, uncomment the :

    # overscan_left=16

    line in ‘/boot/config.txt

    Did you get the ‘hangman.py’ to accept anything other than ‘a’ ?

    Despite reading the documentation for ‘pifacecad.tools.scanf.LCDScanf’ on the ‘http://piface.github.io/pifacecad/reference_tools.html’ web page :

    “To change mode from moving and editing press switch 5 (navigation switch in). Move the navigation switch side to side (switches 6 and 7) to change character”

    I couldn’t get the character to change from an ‘a’ ;-(

    So I can currently only ‘win’ at hangman by specifying my own word to guess as :

    python3 hangman.py aaaa

    ;-)

      • That’s the approach that I found yesterday (essentially by poking stuff until something changed.) It is a bit of an odd user interface though – the full-character cursor makes the characters you are choosing very hard to read and there seem to be extra jog presses required. Is there any particular reason why you did not just go for jog-left to show the previous letter, jog-right to show the next letter, and jog-press to select the currently displayed letter? I’m pretty sure that is what Pat will have tried first.

        • LCDScanf is a generic tool for entering all kinds of data. For example, you can specify that the scanner look for multiple characters like so:

          scanner = LCDScanf("%2c%r")

          http://piface.github.io/pifacecad/tools.html#scanf

          The control interface allows you to move between characters using left or right and, after changing mode, edit a character using the same buttons. In the hangman example even though there is only one character, I still used the LCDScanf utility. Single character entry is the exception in which our interface may feel a little bit clunky. Maybe you can modify the character entry code to better select single characters?

          • OK, I see the reasoning. Might be a good idea to print out some operating instructions to the console when the game, starts, though.

            I have never done much Python, but I like a challenge, so I might just take you up on this.. At the moment, though, I’m deep in trying to write to the LCD using C, Java and Ruby, more familiar languages to me at least!

  3. Pingback: Pi Face Control and Display Case | Raspberry Alpha Omega

  4. Pingback: Programming Raspberry Pi add-ons (a rant and a plea) | Raspberry Alpha Omega

  5. I’m having trouble finding how to use the piface cad in a project the example given on the element14 site is for an Internet radio but then no instructions, have you managed anything practical?

  6. I was hoping for a facility similar to the original PiFace where I could connect an external switch in parallel with the tactile switches – my external switches work from a model train track occupancy detector. I was hoping to be able to use my installation in a headless mode with the PiFace CAD. Is there any way I can connect an external switch to the tactile switches? – e.g. by soldering some wires to the relevant bits of the switch legs on the underside of the PCB.

  7. I set up my LIRC per the instructions, and then struggled to get anything useful out of it. With two known-good remotes, each with fresh batteries, I had to hold the remote nose-to-nose with the piface-cad IR sensor to get anything at all from mode2. And even this was basically just noise/junk.

    As others have evidently succeeded where I have failed, I wonder what the problem can be. Perhaps the IR sensor is a bit flaky? I presume it just wires directly into the GPIO23 header, so hard so see how that could break. Or perhaps the device driver for lirc_rpi is a bit dodgy? Or perhaps it’s something completely different and I’m just being a muppet. I’d be very interested to hear from others that have tried but failed to get the IR working on the pifacecad to see whether there’s any common thread.

    I’ve done all the modprobe config & similar – I DO get results when running mode2 -d /dev/lirc0 (but rubbish). I don’t get anything via lircd / irw. irrecord gives up with timeout message almost every time, though I have managed to get it to think it’s seeing something useful just once, by pressing the IR LED had against the IR sensor when transmitting. It wasn’t useful!

    I’m using a ModelB+ with rapbian, all apt-gotten-up-to-date.

    Other than this little blip, I love this piece of kit and am very impressed with it. Thanks piface!

    James

    • Hi James,
      Have you walked through the LIRC documentation for PiFace Control and Display, here?

      mode2 is supposed to output gibberish, if I recall correctly – that means your IR receiver is working so the problem seems to be a driver issue which, fortunately, is almost always solvable.

      Tom

      • Tom,
        Thanks for your interest. I’m almost certain after much wrangling, that the problem is with the receiver – I’m going to order a replacement for the part from Farnell. I’ve done all the driver setup lirc stuff per the instructions – but the behaviour is just plain odd. I think the built in amplifier in the receiver is broken. I’ll report back when I get around to it…
        James

  8. Thomas,

    some of the web radio addresses for the BBC don’t seem to work on all channels

    I suspect the following:

    1. DRM issues generally with WMA (see http://www.bbc.co.uk/blogs/internet/entries/28dfd220-7ca1-3683-ac16-3938cfb4b882) or WMA support completely abandoned by the BBC (some channels do work where BBC had DRM rights themselves, not however with music)

    or

    2. DRM issues for listeners outside of the UK (typical iPlayer problem)

    I patched radio.py for German channels, no problems now

    LIRC works OK for my old ZYXEL DMA-1000 remote, but radio.rc still doesn’t react – is there a Troubleshoot for this?

Leave a Reply

Your email address will not be published. Required fields are marked *